If you have spent any time on Skincare TikTok or browsing beauty blogs recently, you have likely seen the term “glass skin” dominating the conversation. The pursuit of poreless, hyper-hydrated, luminous skin has led millions of women away from heavy foundations and toward clinical treatments.
For years, the gold standard for achieving this texture has been microneedling a treatment previously reserved for high-end med-spas and dermatologists. But as at-home beauty tech evolves, a new contender has disrupted the market: The Seranova Micro Infusion System.
But with any at-home device involving needles, the first questions are always the same: Is it actually safe? How does it compare to the dermarollers I see on Amazon? And how on earth do I use it without ruining my skin?
While this guide covers the safety and step-by-step usage of the device, if you are looking for our final verdict, Read our full Seranova Micro Infusion review here.
In this comprehensive, 2,000+ word guide, we are breaking down everything you need to know about the Seranova Micro Infusion System. We will compare its safety profile directly against traditional microneedling rollers, walk you through a complete beginner’s step-by-step tutorial, and answer every frequently asked question so you can achieve med-spa results from the comfort of your own bathroom.
Part 1: Traditional Microneedling vs. Seranova Micro Infusion — Which Is Safer?
To understand why the Seranova system is causing such a stir, we first need to understand the fundamental differences between traditional microneedling (dermarolling) and micro-infusion (stamping).
While both techniques aim to stimulate collagen by creating micro-channels in the skin, the mechanics and the safety profiles are entirely different.
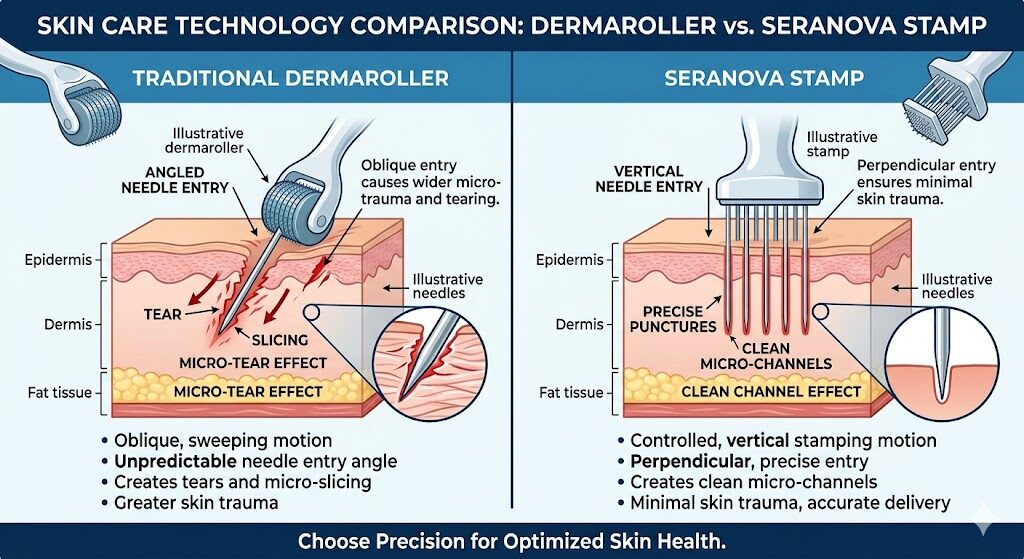
The Mechanics of Traditional Dermarolling
Traditional at-home microneedling is usually done with a “dermaroller.” This is a small wheel covered in hundreds of tiny needles attached to a handle. You roll this wheel back and forth across your face to puncture the epidermis.
The Safety Risks of Rolling:
- The “Track Mark” Effect: Because the needles are on a curved wheel, they enter the skin at an angle, travel through the tissue as the wheel turns, and exit at a different angle. This sweeping motion can cause microscopic tears or “slices” in the skin rather than clean punctures.
- Hygiene Nightmares: Dermarollers are designed to be reused. After rolling them over your skin, dead skin cells, sebum, and bacteria get trapped at the base of the needles. Sterilizing a roller perfectly at home with rubbing alcohol is incredibly difficult, leading to a high risk of bacterial breakouts and infections.
- Uneven Pressure: It is very difficult to apply uniform pressure when rolling a device across the varied contours of your face (jawline, cheekbones, forehead). This often leads to over-treating certain areas and causing unnecessary inflammation.
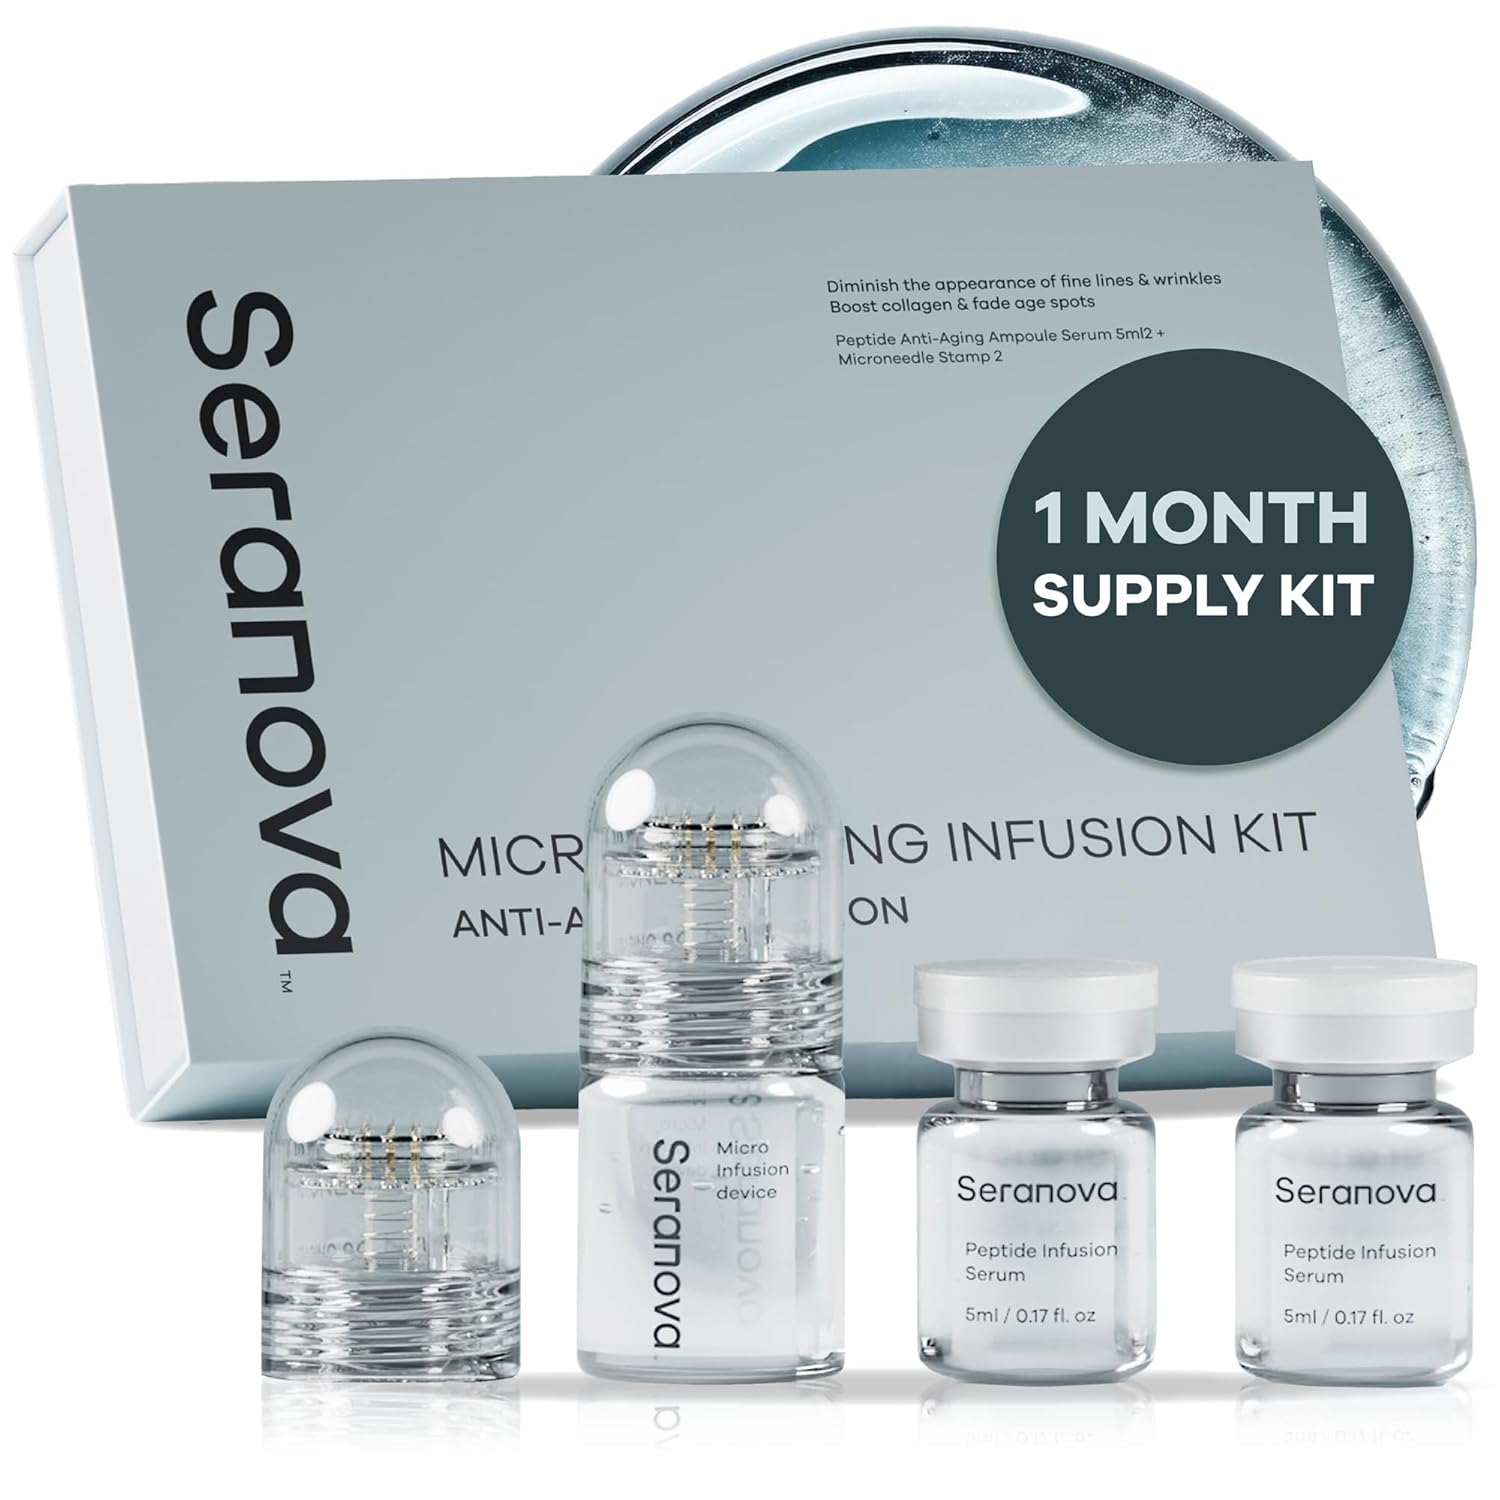
The Mechanics of the Seranova Micro Infusion System
The Seranova system abandons the wheel entirely. Instead, it utilizes a “stamping” mechanism combined with a built-in serum chamber. The head of the device features hollow, 24K gold-plated clinical needles that are exactly 0.5mm in length.
Why Stamping is Scientifically Safer:
- Vertical Penetration (No Tearing): Because you press the Seranova device directly down into the skin and pull it straight back up, the needles enter and exit at a perfect 90-degree angle. There is no dragging, no slicing, and no micro-tearing. The trauma to the skin is precisely controlled.
- Sterile, Single-Use Heads: This is the biggest safety advantage of the Seranova system. The needle heads are disposable. You attach a brand new, clinically sterile head for every single treatment and throw it away afterward. The risk of cross-contamination or rubbing last week’s bacteria into today’s open pores is zero.
- Controlled Depth: The needles are locked at a 0.5mm depth. This is the optimal length to penetrate the stratum corneum (the dead outer layer of skin) and reach the upper dermis without hitting deeper blood vessels or nerve endings. It prevents the user from accidentally pressing too hard and causing deep tissue damage.
The Verdict on Safety
When comparing at-home treatments, the Seranova Micro Infusion System is objectively safer than traditional dermarolling. By eliminating the “drag” factor that causes micro-tears and utilizing single-use, sterile needle heads, Seranova has engineered out the two biggest risks of at-home microneedling: scarring and infection.
Part 2: How Does Micro-Infusion Actually Work?
Now that we know it is safe, how does the Seranova system actually deliver that famous “glass skin” glow? The secret lies in the synergy between the needles and the serum.
When you apply a standard serum to your face with your fingers, up to 90% of it sits on top of the skin’s protective barrier, eventually evaporating or wiping off on your pillowcase. Only a tiny fraction actually penetrates deep enough to make a structural difference.
The 300% Absorption Boost The Seranova needles are hollow. As you stamp the device into your skin, the micro-channels are created, and simultaneously, the serum inside the chamber is pushed directly into those channels.
This bypasses the skin’s outer barrier entirely. You are literally infusing the active ingredients (like peptides, hyaluronic acid, and antioxidants) directly into the living tissue where collagen and elastin are produced. Clinical studies on micro-infusion show that this method can increase product absorption by up to 300% compared to topical application.
The Healing Cascade Furthermore, the tiny, controlled micro-injuries trick your brain into thinking the skin has been damaged. Your body responds by rushing blood, oxygen, and collagen-building fibroblasts to the surface to “heal” the area. This natural healing cascade is what physically plumps fine lines, tightens lax skin, and fades acne scars over time.
Part 3: The Complete Beginner’s Guide to Using Seranova
If you have just unboxed your Seranova Micro Infusion System, the process might feel a little intimidating. Do not worry. The system is designed specifically for beginners.
Follow this comprehensive, step-by-step tutorial to ensure a painless, highly effective treatment.
Phase 1: The Preparation (Do not skip this)
Preparation is just as important as the stamping itself. You should perform this treatment at night, roughly an hour before bed.
- Double Cleanse: Your face must be surgically clean. Wash your face with an oil-based cleanser to remove makeup and sunscreen, followed by a gentle water-based cleanser. Do not use exfoliating scrubs, AHAs, or BHAs on the night you stamp.
- Dry Completely: Pat your skin completely dry with a clean, fresh towel.
- Prepare the Device: Open a fresh, sterile needle head from its blister pack. Do not touch the needles.
- Load the Serum: Twist off the top of the Seranova chamber and pour in your chosen serum. (The Seranova system usually comes with their proprietary peptide/hyaluronic acid blend, which is highly recommended for beginners). Twist the needle head securely onto the chamber.
- Prime the Stamp: Turn the device upside down and gently press the needle head against the inside of its sterile cap a few times until you see the serum start to flow to the tips of the needles.
Phase 2: The Stamping Technique
You will map your face out into zones to ensure even coverage: Forehead, Right Cheek, Left Cheek, Chin/Jawline, and Upper Lip/Nose.
- The 50% Overlap Rule: Starting on your forehead, press the stamp firmly into your skin and lift it straight up. Move the stamp slightly, overlapping your previous stamp by 50%, and press again.
- Keep it Vertical: Always press straight down. Never drag or twist the device while the needles are in contact with your skin.
- Adjust Pressure: The skin on your forehead is thin, so use lighter pressure. The skin on your cheeks is thicker, so you can press slightly firmer. It should feel like a mildly prickly sensation, but it should not be agonizing.
- Treating Fine Lines: Spend extra time stamping directly over areas of concern, such as crow’s feet, smile lines (nasolabial folds), or hyperpigmentation spots.
- Empty the Chamber: Continue stamping across all zones of your face until the serum chamber is completely empty. This usually takes about 5 to 7 minutes.
To see exactly how this healing cascade transformed skin texture over a month, check out our before-and-after photos in our 30-day Seranova results and review.
Phase 3: Post-Care (The “Morning After” Glow)
What you do immediately after stamping dictates your results. Your skin channels will remain open for about 45 to 60 minutes.
- Do Not Wash: Do not wash your face or apply any other products. Let the infused serum work its magic overnight.
- Expect Mild Redness: Your skin will look slightly flushed or pink, similar to a mild sunburn. This is a good thing—it means the blood is rushing to the surface to build collagen. The redness will dissipate within a few hours.
- Sleep on a Clean Pillowcase: Swap out your pillowcase for a fresh, clean one (silk is preferred) to avoid introducing bacteria to your newly stamped skin.
- The Next Morning: Wake up, gently rinse your face with lukewarm water, and apply a thick, soothing moisturizer. You must apply SPF 30 or higher. Your skin will be slightly more photosensitive for the next 48 hours. Avoid direct sun exposure and heavy makeup if possible.
Part 4: Advanced Tips for Maximizing Your Results
Once you have mastered the beginner’s routine, you can start tweaking your protocol to target specific skin concerns.
Frequency of Use: More is not always better. The skin needs time to complete the collagen-building cycle.
- Beginners: Start with one treatment every 2 weeks.
- Advanced/Maintenance: Once your skin is acclimated, you can increase to one treatment every 7 to 10 days. Never use the stamp daily.
Targeting Specific Concerns: While the standard hydrating serum is fantastic, you can customize your infusion:
- For Anti-Aging: Look for serums rich in Copper Peptides and Epidermal Growth Factors (EGF). These act as messengers, telling your skin cells to repair and regenerate.
- For Hyperpigmentation & Dark Spots: Infuse a gentle Vitamin C serum (ensure it is formulated for microneedling and not highly acidic) or Tranexamic Acid to break up melanin clusters from the inside out.
- For “Glass Skin” Events: Infuse pure, high-molecular-weight Hyaluronic Acid the night before a wedding or big event for maximum surface plumping and hydration.
Part 5: Frequently Asked Questions (FAQ)
To wrap up this ultimate guide, we have compiled the most common questions our readers ask before making the jump to the Seranova Micro Infusion System.
Does the Seranova Micro Infusion System hurt? No, it is generally considered painless. The needles are exceptionally fine (24K gold-plated) and only reach 0.5mm into the skin. Most users describe the sensation as a mild “prickling” or “scratchy” feeling. It is significantly more comfortable than professional med-spa microneedling, which often requires numbing cream.
Will it make my face bleed? At a 0.5mm depth, you should not experience active bleeding. You may see occasional, microscopic “pinpoint” redness in areas where the skin is very thin (like the forehead), but you will not look like you have been in a horror movie. If you are bleeding, you are pressing far too hard.
Can I use my own serums with the Seranova device? Technically, yes, but you must be incredibly careful. Because you are bypassing the skin barrier, you should only use sterile, high-quality serums specifically formulated for microneedling. Avoid serums with artificial fragrances, essential oils, high-strength retinoids, or strong exfoliating acids (AHAs/BHAs), as these can cause severe irritation when infused directly into the dermis. Stick to Hyaluronic Acid and Peptides.
How often do I need to replace the needle heads? You must replace the needle head after every single use. Do not attempt to boil, bleach, or alcohol-soak a used head to save money. Microscopic dulling of the needles occurs after one use, and reusing them increases your risk of skin tearing and bacterial infection.
Is it safe for active acne? No. You should never microneedle or micro-infuse over active, inflamed acne breakouts or cystic pimples. Stamping over a pimple can rupture the bacteria and spread it across the rest of your face, causing a massive breakout. Wait until the acne has fully healed and flattened before using the device to help fade the leftover hyperpigmentation scars.
How long does it take to see results? You will notice the “immediate” results the very next morning—your skin will look incredibly hydrated, plump, and glowing. However, true structural results (like the softening of fine lines and increased elasticity) take time, as your body needs to build new collagen. Expect to see significant, lasting improvements after 4 to 6 weeks of consistent use.
The Bottom Line
Taking the leap from topical creams to at-home micro-infusion can feel like a big step. However, when comparing the outdated, risky mechanics of traditional dermarollers to the sterile, precise, vertical stamping of the Seranova Micro Infusion System, the choice is clear.
By respecting the device, following the strict hygiene protocols, and remaining consistent, you can safely unlock the clinical-level “glass skin” results you have been searching for without the clinical price tag.
A Note of Thanks: This article includes affiliate links to products we truly admire. If you choose to purchase through them, we may receive a small commission at absolutely no extra cost to you. This simple act supports our team and allows us to keep researching, testing, and bringing you the best solutions. Thank you for trusting us to be part of your journey!